Octoprint Has No Slicing Profile When Uploading Files
If y'all own a 3D printer, you'll likely accept at least heard of OctoPrint, created by Gina Häußge and maintained by her and Guy Sheffer! OctoPrint has the potential to transform your 3D printing workflow for the better, and information technology's very easy to gear up. This guide will take y'all through the setup process step by step, and give y'all some handy tips along the style.

Earlier we start finding out how to install OctoPrint, let's look at why you might want to. OctoPrint is a piece of open-source software that allows us to add WiFi functionality to whatever 3D printer with a USB port (which is pretty much all of them). More specifically, you'll be able to driblet files from your computer onto your printer, kickoff/stop prints, monitor your printer via a live video feed, control the motors, control the temperature, and more than, all from your web browser. Of course, with groovy ability comes great responsibility — 3D printers take parts that are hot enough to cause fires, then make sure you have a safe setup, which may include not letting it run unsupervised.
OctoPrint ingredients
• Raspberry Pi iii (or newer)
• MicroSD carte
• Raspberry Pi power adapter
• USB cable (the connector type will depend on your printer)
• Webcam/Raspberry Pi Photographic camera Module (optional)
• 3D-printed photographic camera mount (optional)
Before we become started, it is not recommended that anything less than a Raspberry Pi three is used for this project. There take been reports of limited success using OctoPrint on a Raspberry Pi Zero Due west, but only if you have no intention of using a camera to monitor your prints. If you want to try this with a Pi Zippo or an older Raspberry Pi, you may experience unexpected impress failures.
Download OctoPi
Firstly, you will need to download the latest version of OctoPi from the OctoPrint website. OctoPi (created by Guy Sheffer) is a Raspbian distribution that comes with OctoPrint, video streaming software, and CuraEngine for slicing models on your Raspberry Pi. When this has finished downloading, unzip the file and put the resulting IMG file somewhere handy.
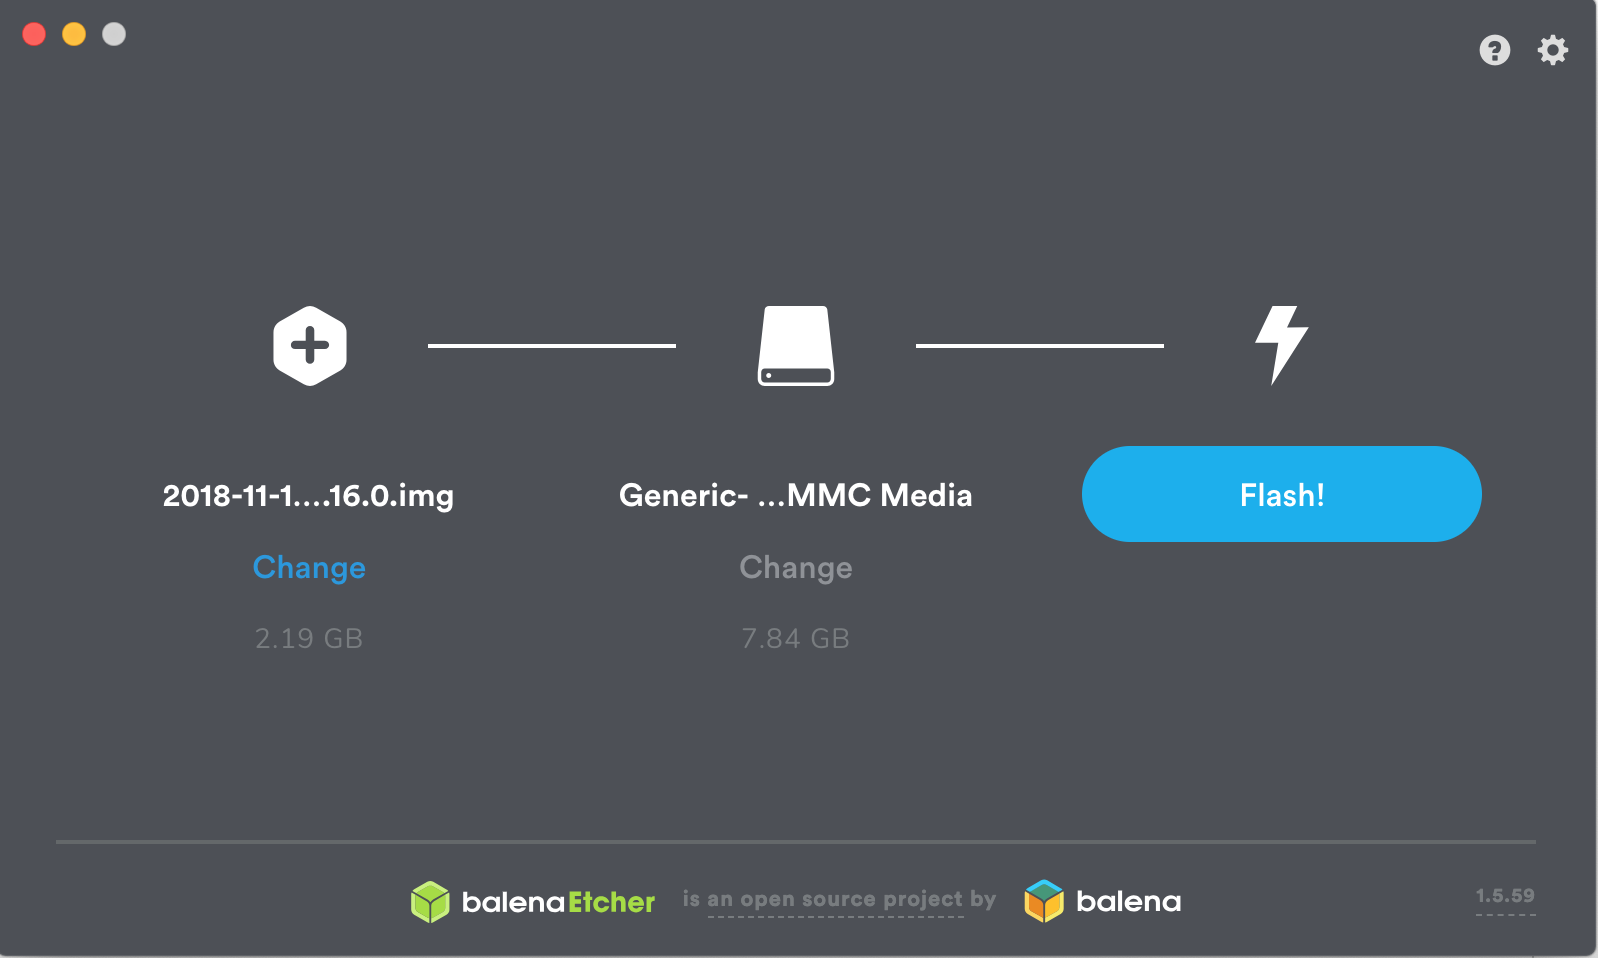
Next, we need to flash this prototype onto our microSD card. We recommend using Etcher to do this, due to its minimal UI and ease of use; plus information technology's also bachelor to employ on both Windows and Mac. Get it here: balena.io/etcher. When Etcher is installed and running, you'll meet the UI displayed. Simply click the Select Image button and find the IMG file you unzipped earlier. Adjacent, put your microSD card into your computer and select it in the middle column of the Etcher interface.
Finally, click on Flash!, and while the image is being burned onto the card, get your WiFi router details, as y'all'll need them for the next pace.
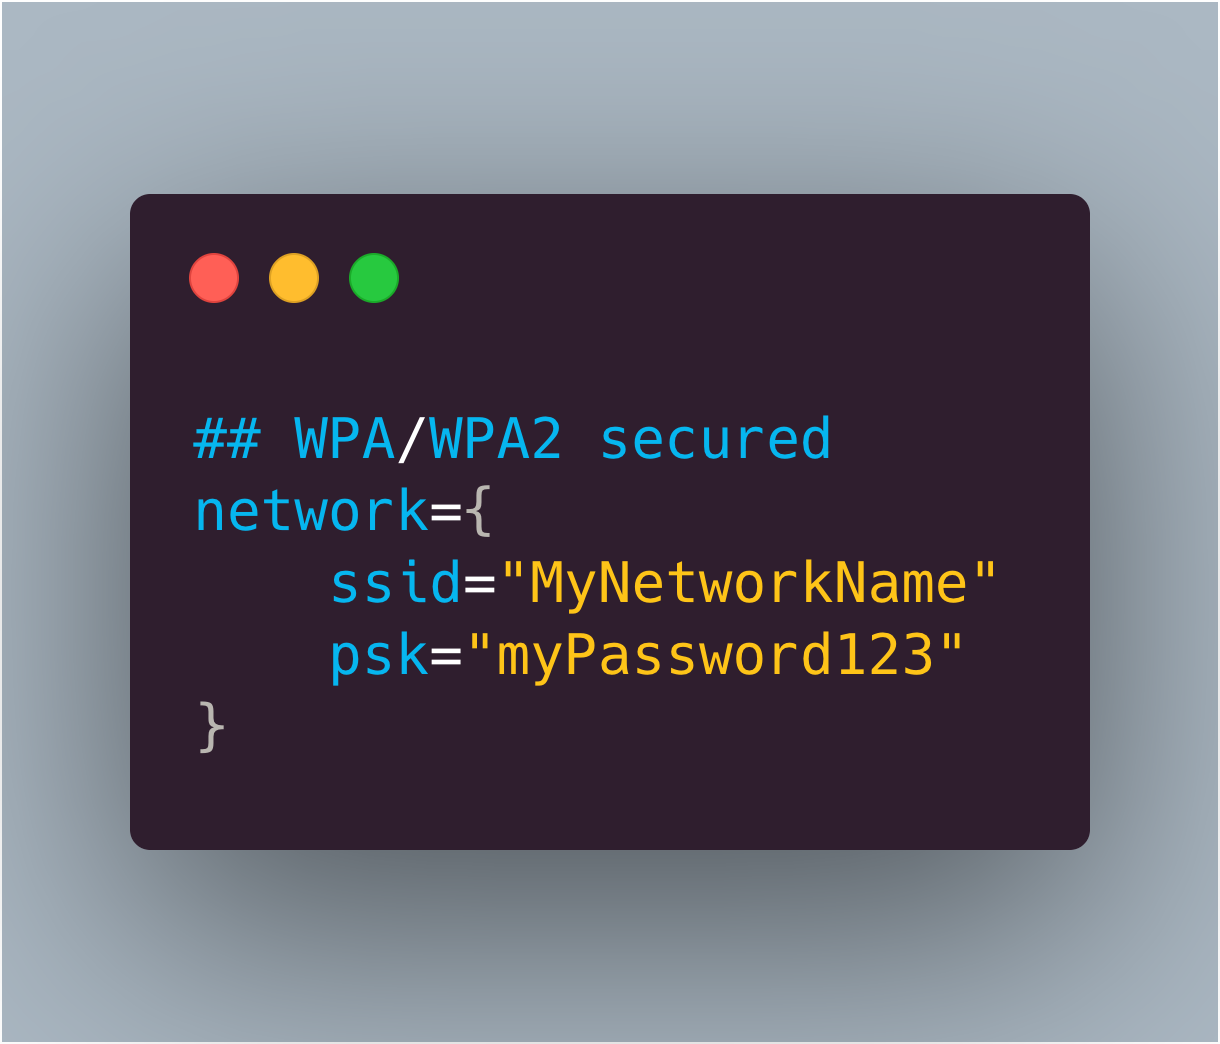
Now that you lot have your operating system, you'll want to add your WiFi details so that the Raspberry Pi can automatically connect to your network after information technology's booted. To practise this, remove the microSD carte du jour from your estimator (Etcher volition have 'ejected' the carte du jour after it has finished burning the paradigm onto it) and so plug it dorsum in once more. Navigate to the microSD card on your computer — it should now be chosen boot — and open up the file chosen octopi-wpa-supplicant.txt. Editing this file using WordPad or TextEdit can crusade formatting problems; we recommend using Notepad++ to update this file, but there are instructions within the file itself to mitigate formatting issues if you practise choose to use another text editor. Discover the section that begins ## WPA/WPA2 secured and remove the hash signs from the four lines below this one to uncomment them. Finally, replace the SSID value and the PSK value with the name and countersign for your WiFi network, respectively (keeping the quotation marks). See the example below for how this should await.
Further down in the file, there is a department for what country yous are in. If you are using OctoPrint in the United kingdom of great britain and northern ireland, leave this as is (by default, the UK is selected). All the same, if you wish to alter this, merely annotate the UK line once more past calculation a # before information technology, and uncomment whichever country y'all are setting upwardly OctoPrint in. The example beneath shows how the file volition look if you are setting this upward for use in the US:
# Uncomment the country your Pi is in to actuate Wifi in RaspberryPi three B+ and above # For total list meet: https://en.wikipedia.org/ wiki/ISO_3166-1_alpha-2 #country=GB # United Kingdom #country=CA # Canada #country=DE # Germany #country=FR # France country=United states of america # Usa
When the changes have been fabricated, save the file and so squirt/unmount and remove the microSD card from your reckoner and put it into your Raspberry Pi. Plug the power supply in, and become and make a loving cup of tea while it boots upwardly for the first time (this may have around x minutes). Make certain the Raspberry Pi is running as expected (i.due east. check that the green status LED is flashing intermittently). If yous're using macOS, visit octopi.local in your browser of choice. If you're using Windows, you can discover OctoPrint past clicking on the Network tab in the sidebar. It should be called OctoPrint instance on octopi – double-clicking on this volition open the OctoPrint dashboard in your browser.
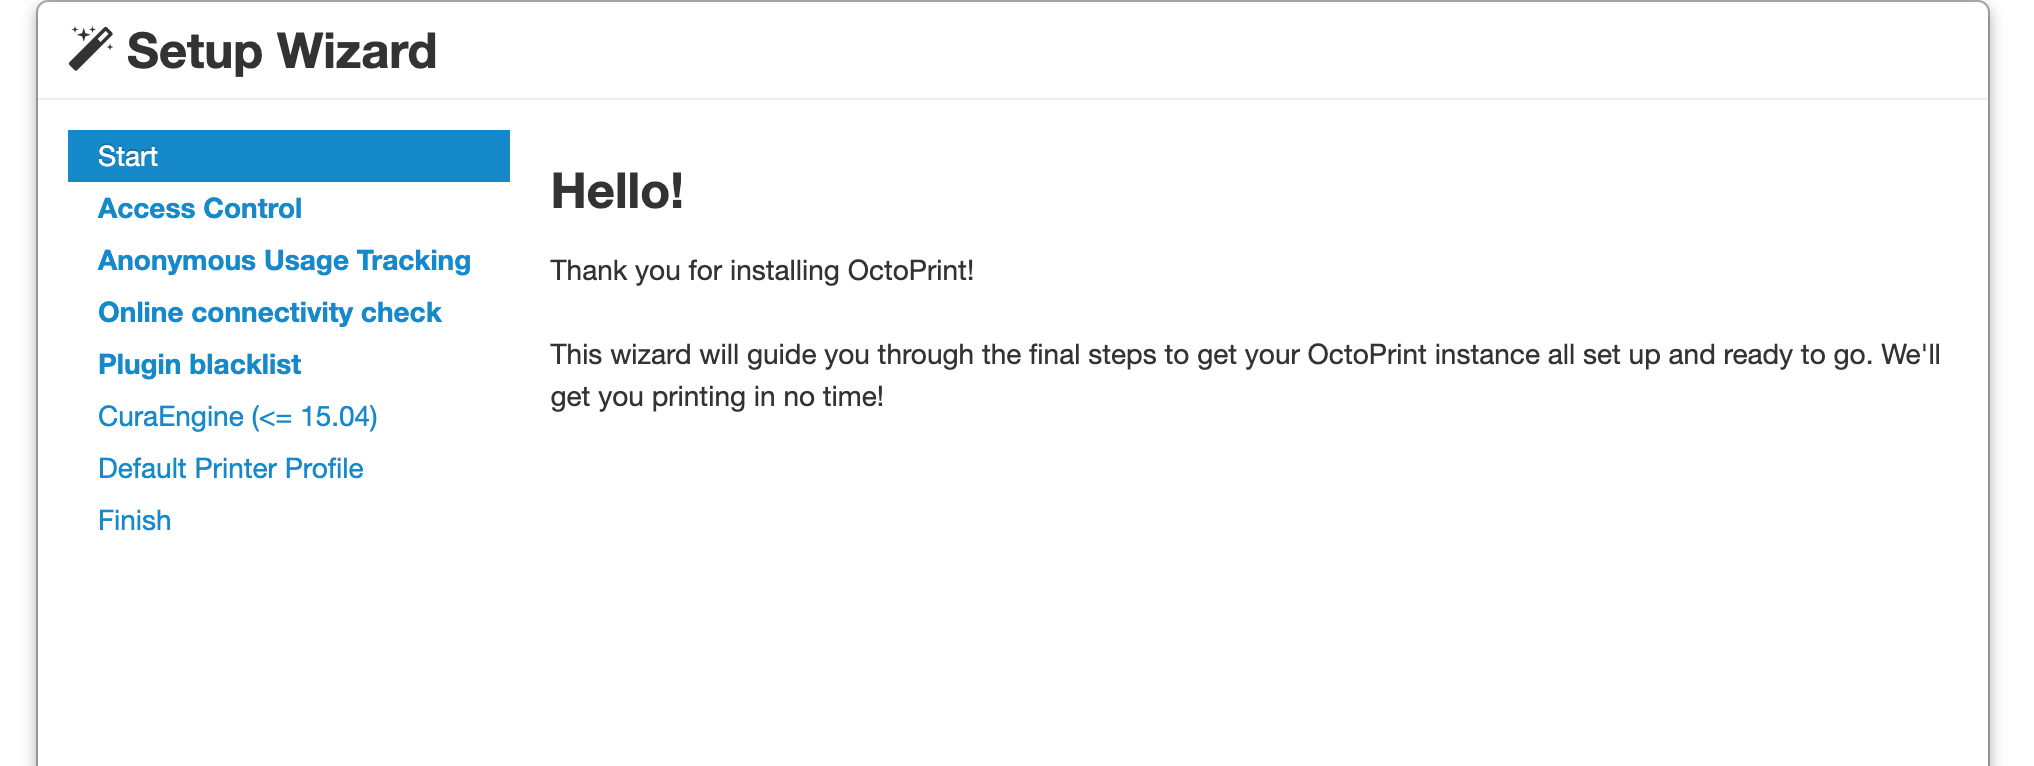
If y'all see the screen shown above, then congratulations! You have set upwardly OctoPrint.
Not seeing that OctoPrint splash screen? Fear not, you are not the showtime. While a full list of issues is across the scope of this commodity, common problems include: double-checking your WiFi details are entered correctly in the octopi-wpa-supplicant.txt file, ensuring your Raspberry Pi is working correctly (plug the Raspberry Pi into a monitor and sentry what happens during kick), or your Raspberry Pi may be out of range of your WiFi router. At that place's a detailed list of troubleshooting suggestions on the OctoPrint website.
Printing with OctoPrint
We now take the opportunity to ready OctoPrint for our printer using the handy wizard. Almost of this is very straightforward — setting upward a countersign, signing up to ship bearding usage stats, etc. — but there are a few sections which require a niggling more thought.
We recommend enabling the connectivity cheque and the plug-ins blacklist to help keep things nice and stable. If you program on using OctoPrint as your slicer as well as a monitoring tool, then you tin can use this step to import a Cura profile. However, nosotros recommend skipping this step as information technology's much quicker (and y'all can use a slicer of your option) to slice the model on your computer, and then ship the finished G-code over.
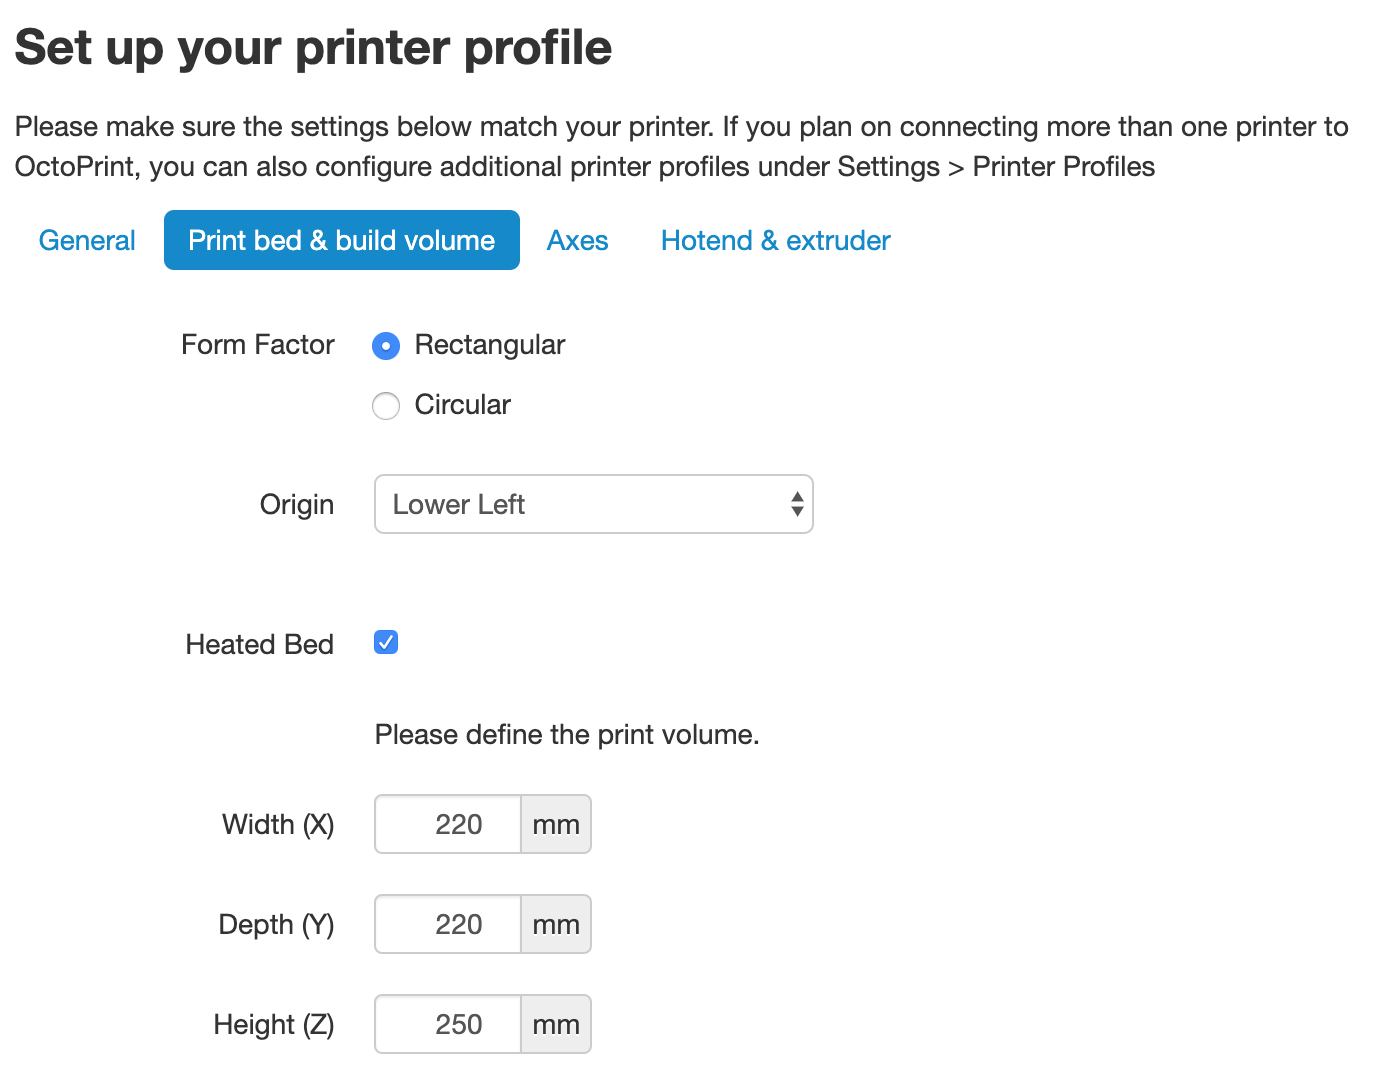
Finally, we need to put in our printer details. Above, we've included some of the specs of the Creality Ender-iii as an case. If you lot can't discover the verbal details of your printer, a quick web search should show what you need for this section.
The General tab can have annihilation in it, it'southward merely an identifier for your ain use. Impress bed & build book should exist like shooting fish in a barrel to find out — if not, you can measure your print bed and discover out the position of the origin by looking at your Cura printer profile. Get out Axes equally default; for the Hotend and extruder section, defaults are most certainly fine here (unless you've changed your nozzle; 0.four is the default diameter for most consumer printers).
OctoPrint is better with a camera
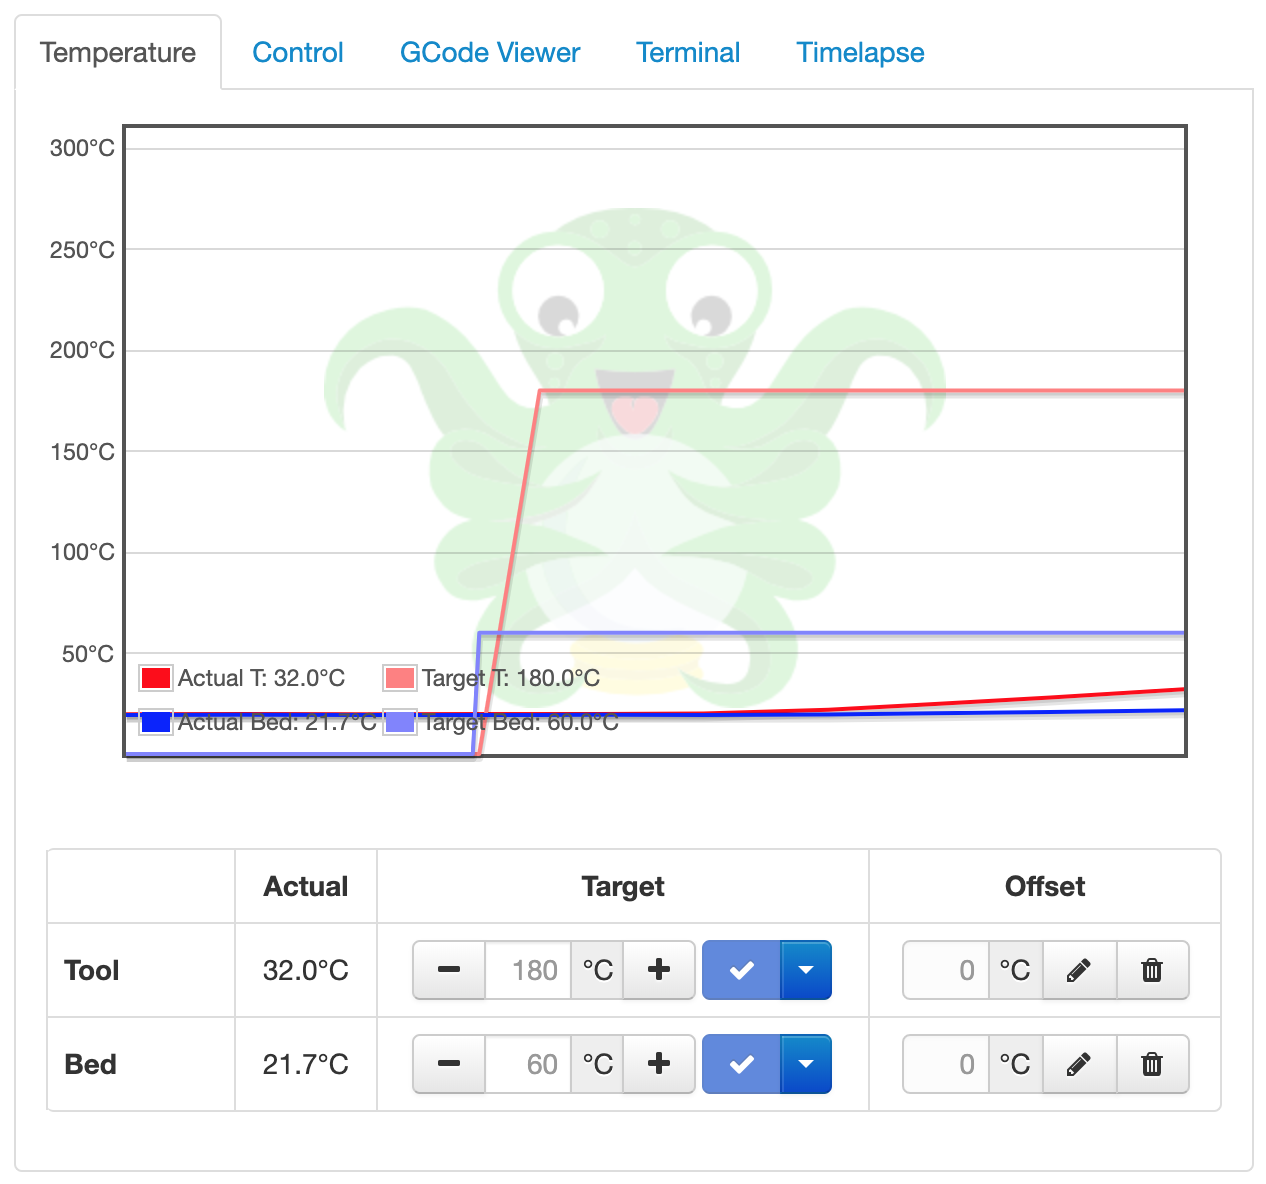
Now that yous're set up with OctoPrint, you lot're prepare to start printing. Plough off your Raspberry Pi, so plug it into your 3D printer. After it has booted up, open OctoPrint once again in your browser and take your newly WiFi-enabled printer for a spin by clicking the Connect button. After it has continued, you'll be able to set the hot end and bed temperature, then watch as the real-time readings are updated.
In the Control tab, we can run into the camera stream (if you're using ane) and the motor controls, as well as commands to habitation the axes. There's a Thousand-code file viewer to await through a cross-department of the currently loaded model, and a final to send custom G-code commands to your printer. The terminal tab is for making time-lapses; however, there is a plug-in available to help with this process.
Undoubtedly the easiest style to fix video monitoring of your prints is to utilize the official Raspberry Pi Camera Module. There are dozens of crawly mounts on Thingiverse for a Raspberry Pi Camera Module, to allow you to get the all-time angle of your models equally they print. There are also some crawly OctoPrint-themed Raspberry Pi cases to house your new printer brains. While information technology isn't officially supported by OctoPrint, you can use a USB webcam instead if you have one handy, or only want some very loftier-quality video streams. The OctoPrint wiki has a crowdsourced list of webcams known to work, besides as a link for the actress steps needed to become the webcam working correctly.
Equally mentioned earlier, our recommended style of printing a model using OctoPrint is to beginning utilize your slicer every bit you would if you lot were creating a file to salve to a microSD carte. Once yous have the file, save information technology somewhere handy on your computer, and open the OctoPrint interface. In the bottom left of the screen, yous will see the Upload File push button — click this and upload the G-code you wish to print.
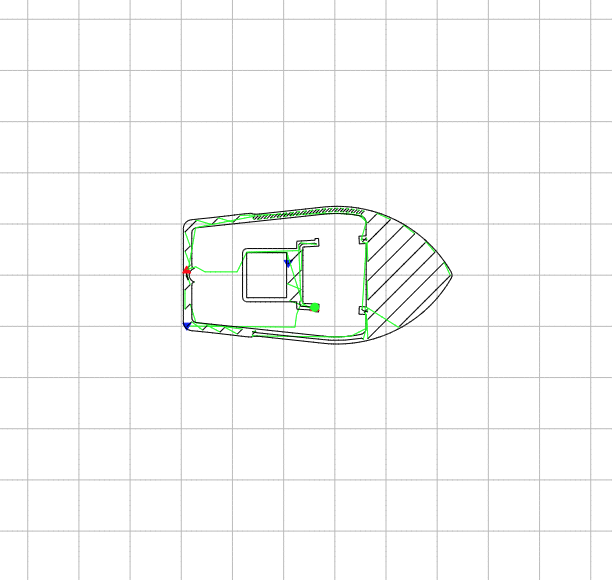
You lot'll see the file/print details appear, including information on how long it'll take for the object to impress. Before you boot things off, bank check out the One thousand-code Viewer tab on the right. Y'all can not merely scroll through the layers of the object, simply, using the slider at the bottom, you lot can see the exact design the 3D printer volition use to 'draw' each layer. Now click Print and watch your printer jump into action!
OctoPrint has scores of customs-created plug-ins, simply our favourite, Octolapse, makes beautiful hypnotic time-lapses. What makes them so special is that the plug-in alters the G-code of any object yous are printing so that once each layer has finished, the extruder moves away from the print to allow the camera take an unobstructed shot of the model. The result is an object that seems to grow out of the build plate equally if past magic. You lot'll non find a finer example of it than here.
Thank you to Gina and Guy
OctoPrint was created and is maintained by Gina Häußge (@foosel) and Guy Sheffer (@GuySoft)! A big give thanks you to both of them for putting in many, many volunteer hours to provide the world with an amazing slice of complimentary, open-source software.
Head over to the OctoPrint website to observe out how y'all tin can support OctoPrint's connected existence.
Thank you to Glenn and HackSpace mag
This tutorial comes fresh from the pages of HackSpace magazine consequence 26 and was written by Glenn Horan. Thanks, Glenn.
To get your copy of HackSpace mag issue 26, visit your local newsagent, the Raspberry Pi Store, Cambridge, or the Raspberry Pi Printing online shop.
Fans of HackSpace magazine will also score themselves a rather delightful Adafruit Circuit Playground Express with a 12-month subscription. Sweet!
Source: https://www.raspberrypi.com/news/how-to-set-up-octoprint-on-your-raspberry-pi/
Post a Comment for "Octoprint Has No Slicing Profile When Uploading Files"